
In this post I’ll show you how to make a Town Signpost Cushion using applique techniques. It’s quite fun to do, and you can personalise it to the towns that mean something to you.

 Just to give you a bit of background to this project, a couple of weeks ago, I had heard about the Hillarys blogger craft competition, with a chance to win £1000. If you’re curious, you can see the other entries on their Pinterest board – lots of talent out there! Anyway, I was intrigued, and I do love making things, although usually with paint rather than sewing, but I thought I would give it a go! They had 4 fabrics to choose from, and I went with the cute retro daisy print (official name – Daisy Pistachio). They sent me a 1m2 sample and the challenge was to create something with it.
This is where I was stuck for a while. I felt to be in win a chance of winning, it would have to be something really different and creative, I was thinking upcycled furniture or stuffed animals. Then I was like, I want to create something that I want in my home, something that I would actually buy. That’s how I got to the cushion idea, but not just a simple cushion, a personalised one that means something to my home. I saw something similar in Debenhams last year, featuring American Towns on a sign post. So I designed one that featured all the towns my boy has lived in the 3 years of his life – Brixton, Greenford, Uxbridge and Slough. They are not the most glam of places, so you definitely could not buy this in the shops! Here is a sketch of my idea:

Next I had to buy some supplies, so I said to my boy, come on, we’re getting on a train to Windsor! He was ready at the door immediately, he does love trains oh so much. We went to C&H in Daniels, which is my nearest fabrics store. Now stepping in this store is like stepping back to 1970, and that’s including the staff. You do feel as though you have to whisper. Luckily Tyler had fallen asleep in the pushchair by now. I wandered around quite stumped, and then I spotted this scrap fabric stand by the till, 6 for £1 or 20p each. And all the scraps were shades of green – destiny! I also got a square of grey felt to cut my letters out of, a big batch of buttons from The Works which cost £1.99, and from Poundworld I bought embroidery thread and fabric glue for £1 each – bargain!

 With the letters of the towns, I was going to do capital letters, but then I thought the handwritten look is more in fashion. This would be more tricky to do, but worth it. I drew out my letters on paper first, and then drew them backwards on to the felt using a Sharpie pen. Then I cut the letters out and placed in position on the fabrics.

I cut out the fabrics in the sizes I needed and ironed the edges so it would be easier to sew. I used an existing cushion cover as a template. I then ransacked my mum’s sewing basket, and found some velcro which I would use for the cushion fastening. So here are my supplies so far:

I used a cheap brush to brush fabric glue to the back of the letters and stick them on to the fabric. This required real concentration, and my fingers got rather sticky!

The next evening when the glue had dried, I pinned the fabrics in position ready for sewing.

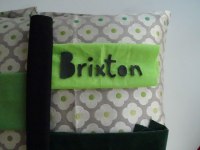
The following evening I chose a dark brown embroidery thread for contrast, and appliqued on the town pieces using running stitch. I wanted them to have a handmade look. The yellow pvc fabric was glued on using fabric glue.

I had to borrow my mum’s sewing machine next, so that weekend I took my fabrics and machine-stiched on the black signpost. I thought it would have a nice contrast being machine stitched next to the hand-stitched signs.

Here is how it looked after all the appliquing.

Back at my mum’s on Tuesday, I did the velcro fastening. I had cut the back piece of the cushion into two pieces, with a smaller section at the top. Then I machine stitched the two sides of the velcro to the two cushion pieces, as you can see here:

I thought something looked missing from it, and decided a black piping border around the cushion would bring it together. Where I work in Kentish Town is a lovely craft shop called the London Bead Co., where the bell jingles as you walk in. I love shopping in there, and the staff are so cheerful. I found a 2m strip of black cotton edging for £2.30. Back at my mum’s I machined-stitched it on the edge of the cushion squares. Then I machine-stitched the back piece on to the front, ensuring the black piping would be visible when I turned it inside out.

And Voila! Oh, this is where my boy just popped his head in while I tried to take a finished photo, going ‘I wanna!’

Take two. Voila!

And the back:

I am so pleased with it, it’s exactly how I envisioned it, and perfect for our home. Here are some home shots so you can see how it looks:


I hope you enjoyed this post and maybe are inspired to create your own Town Signpost Cushion!
Disclaimer: This is a competition entry for the Hillarys Craft Competition 2015

Wow, I love this – clever you! x #HomeEtc
LikeLike
Thank you! xx
LikeLike
Very cool! Thanks for linking up to #brilliantblogposts x
LikeLike
Thanks so much Honest Mum! xx
LikeLike
This is so clever and personal – I love it! xx
LikeLike
Thank you so much! xx
LikeLike
This is a great idea and something that can be so personal. I have sewing machine, and I really should get it out more! xx #bigfatlinky
LikeLike
Thank you, I love that it’s personalised, so you can make your own too! Yeah get the machine out! 😀
xx
LikeLike
That’s such great idea! It looks awesome! I’m suddenly tempted to start sewing again.. #SundayStars
LikeLike
Thank you! I’m so happy it inspired you to sew again too 😀 xx
LikeLiked by 1 person
oh wow! So impressed! I’m completely naff at sewing but this looks great and I’m quite inspired! Hope you get on ok in the competition!! xx #binkylinky
LikeLike
Thank yo so much! I’m not great at sewing either, that’s why this took over 3 weeks of my life! It was so worth it though, I love my cushion. Fingers crossed I get chosen in the comp, but there were so many good entries – lots of talent out there! xx
LikeLike
Good effort, it looks great. Good luck in the competition. Thanks for linking up to the #BinkyLinky
LikeLike
Thank you, I’m pretty pleased with it. Fingers crossed for the comp! xx
LikeLike
Well done! This is great, especially with the bedspread.
LikeLike
Thank you, and yes I’m so happy with how it looks on that bedspread, rather stylish! xx
LikeLike
Clever girl Sabrina!! You are a marvel — I love howe creative you are!!! It was such a fun competition wasn’t it?! I can’t wait to go and look at all the other entries!! 🙂 Thanks so much for linking up with #HomeEtc — hope to see you again next week! x
Caro | http://www.thetwinklediaries.co.uk
LikeLike
Oh thank you Caro, you are too kind! It was really fun, I really enjoyed it. I don’t really sew much, so it was nice to have the challenge to do something different. There are so many great entries, I keep looking at the Pinterest board, so much talent out there! Fingers crossed for us! xx
LikeLike
We always need scraps for school so thanks for the tip on where to get them and well done 🙂
Thanks for linking up #bigfatlinky
LikeLike
Oh brilliant, glad I helped – let me know if you get a smile from the staff 😉 xx
LikeLike
So clever and what a fab unique piece! Love it 🙂 Jess x #HomeEtc
LikeLike
Thank you! I’m so happy with it, hopefully it’ll inspire others out there to get sewing! xx
LikeLike
I love this cushion, what a great idea! Good luck, with the competition! I entered too, but your sewing skills are much neater than mine 😀 Thanks for linking up with #sundaystars
LikeLike
Thank you! Ooh have you entered too, I’ll have to check yours out. It was good fun wasn’t it! Good luck to you too, I hear they’re announcing the 10 finalists on monday now – eek! xx
LikeLike
Oh my god, I LOVE your owl! That is the coolest idea – I love the contrast of the fabric on the tummy bit – you so should get through! xx
LikeLike
Pingback: Me and Mine – June 2015 |·