
You may remember this photo from my Instagram feed last week of brightly coloured paint – aren’t the colours lovely?! Well I can now reveal what I was working on.

A few weeks ago Ocean Finance asked 8 families to join in on their ‘Pimp my Shed’ challenge. I was delighted to be asked, but the only problem was that we don’t have a garden shed or any garden furniture actually – eek. But then I had a brainwave. My mother-in-law has a huge garden that faces directly on to the Central Line (yes really!), and Tyler is always standing in the garden waiting for a train to go by. So she could really do with a garden bench so we can sit in her lovely garden and watch trains.
A garden bench makeover it was to be! Together with my siblings, we went off to B&M and got a wagon wheel garden bench for £39.99, which is quite a bargain. They helped me load it into my car (thank god I had a Yaris now instead of my old Mini, it would not have fitted!). My good old bro brought it into my mother-in-law’s house, and I built it later that week. This is how it looked.
BEFORE:

It is nice, but could do with a bit of colour to liven it up! I went to B&Q and browse the outdoor paint aisle. I was amazed at how many colours choices there are now for garden furniture. I wanted all the colours! I went for Ronseal Garden Paint in 250ml cans and narrowed it down to 4 colours – Daisy (white), Summer Sky (blue), Pink Jasmine (pink) and Sundial (yellow). The cans say that the paint would be rainproof in 1 hour, and that I’d need to do 3 coats. I also bought B&Q paint brushes and Diall wide masking tape, as I had a geometric design in mind.

METHOD:
1)I wanted to have a triangle design in alternating colours, with the wood showing through between the triangles. I masked out my triangles, and also half of the wagon wheels at the sides.

2) With blue and yellow, I painted stripes on the top half of the bench. The sun had come out now, so that was good for helping the paint to dry quick.

3) With pink and white I painted stripes on the seated part.

4) I then painted half of the wagon wheels on the outside as so:

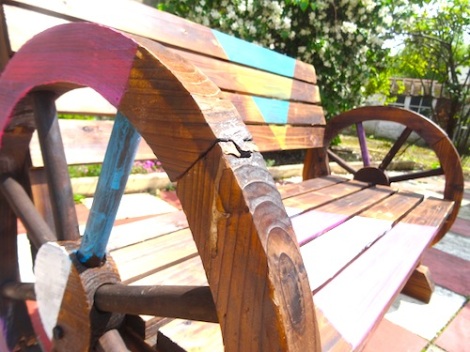
5) The paint had dried quite quickly due to the sunshine so I took the masking tape off and… TADA! Here is how the bench looks now:

It needs a few more coats, which I will add on another day, as thunderstorms were due that afternoon!
AFTER:


We came back to the house today with Tyler and he LOVES the bench! He loves all the colours and sitting on the triangle bit.

So much excitement for naming the colours, I think I made the right choice!

And it’s perfect for Tyler and his granny to sit and watch the trains go by 😀

I hope you like my makeover! And it just shows that you don’t have to paint a whole piece of furniture to change the look, geometric patterns with the original wood still showing is quite in fashion now, and easy to do. If you are painting small parts of garden furniture, I totally recommend the Ronseal 250ml pots – they are only £4 and that way you aren’t left with too much leftover paint.
Thank you Ocean Finance for this challenge, you may have just made Tyler’s day!
Sabrina x
This is a collaborative post with Ocean Finance, who provide Homeowner Loans. They kindly supplied me with £75 to do this makeover.

Gosh, all your graphic-designery colours coming out! Love the creative design, let us see what it looks like with a few more coats of paint… Gorgeous shades.
I’ve never been into B&M in the town centre; we’re moving and will have a garden soon, so I’ll be popping in to have a look for garden furniture.
LikeLike
Ahh thank you! Yes I think the colours will pop out a lot more with a few more coats. You can get loads of garden bits and bobs from B&M at bargain prices, you’ll love it! Xx
LikeLike
that is a stunning bench either way. The colours look fab for summer though!
LikeLike
It’s so different isn’t it, it really caught my eye when I saw it in B&M xx
LikeLike
That bench is so cute I love the way that you didn’t over do the bench and oove the colour choice too x
LikeLike
Thank you, that’s exactly how I wanted it, just a pop of colour! Xx
LikeLike
I really love the bright colours gives the bench colour but not over the top.
LikeLike
Thank you, a little splash of summer! Xx
LikeLike
Wow, I really love the bright colours, it gives it a new lease of life!
LikeLike
Thank you, I’m really pleased with it! Xx
LikeLike
What a unique design for a bench! I love it already, but the new colour really adds to it x
LikeLike
Thank you! I just had that idea in my head, and I’m so pleased with it! Xx
LikeLike
I love it! Youve done a great job
LikeLike
Thanks so much! Xx
LikeLiked by 1 person
Love the colour choice. #HomeEtc
LikeLike
Thank you 🙂 X
LikeLike
Love those colours you choose, they really pop. The bench looks a great edition to your mum’s garden. #HomeEtc
LikeLike
Thank you, I’m so pleased with it, and the mother-in-law is happy too! X
LikeLike
I love the design — it’s going to look amazing with a couple of extra coats, to really make the colours pop. Have you tried the Valspar outdoor paint from B&Q — I’ve been using that to paint my shed — am SO impressed with it!!!! And it comes in hundreds of colours!! Thanks so much for linking up pet! Caro #HomeEtc
LikeLike
Oh yes, it’s so bright with one coat, i can imagine it will be even brighter with 3 coats! I’ve heard loads about this Valspar paint but yet to try it. I saw so many colours at B&Q, so many choices these days! Xx
LikeLike
I’m really surprised how vibrant those colours are on the dark wood, it turned out so well!
#HomeEtc
LikeLike
Yes I didn’t expect one coat to come out so bright on dark wood, it’s really good paint! X
LikeLike
Ah it looks great, I love the shapes you’ve chosen x #HomeEtc
LikeLike
Thanks so much! Xx
LikeLike
You’ve done such a good job, what a subtle difference. Great way to add a pop of colour! #homeetc
LikeLike
Thank you xx
LikeLike
Superb and so original too! Lovely designs and what a cute photo at the end! Thanks for sharing. Jess xx #HomeEtc
LikeLike
Thank you 🙂 Nice to get creative one last time before baby arrives! xx
LikeLike
Loving the bright colours, looks fab!
LikeLike
Thank you! Xx
LikeLike
Pingback: A Look Back At 2016 | The Mummy Stylist·